Saturday, November 20, 2010
Integration of soapUI tests in maven build lifecycle
We can include soapUI tests in SVN and run these tests as part of continuous integration testing.
We can use below tools to achieve this.
soapUI: Webservices testing tool.
SVN: Version control system.
Maven: Build tool
Continuum: Continuous integration server
Here is the link
We can use below tools to achieve this.
soapUI: Webservices testing tool.
SVN: Version control system.
Maven: Build tool
Continuum: Continuous integration server
Here is the link
Functional Web Services Testing Made Easy with SoapUI
Today, I read about Web Services Testing article on this website. LINK
Tuesday, November 16, 2010
How to setup Selenium Grid on Cloud MAC Server.
Here are the steps
1. Install VMWare Fusion on MAC server.
2. Load various OS/Browser VM's onto MAC SERVER
3. Create scripts to start and stop VM's from OS/X
4. Install Selenium Grid on MAC server
5. Create scripts to start and stop GRID.
6. Setup Selenium RC's on VM's and include RC's in the startup and run RC's on background.
7. Commands to Stop/Start GRID and VM's
Step1:
Download VMWare fusion from http://www.vmware.com/products/fusion/
Step2:
Create various OS/Browser VM's and Zip it and transfer onto MAC server
You can skip this step if MAC sever is located in your premises. You can transfer VM file using external hard driver or USB drive
For zipping use below command
gzip filename
A compressed file with extension .gz will be created.
To transfer the file to the MAC server use below command
navigate to the directory where file is located. Then enter below command
sftp macServerusername@macServerIP
it ask for password, enter the password, then “sftp<” promt will display.
Then enter below command
put filename
once transfer is completed, unzip the file. Use below command
gunzip filename
Step 6:Setup Selenium RC's on VM's and include RC's in the startup and run RC's on background.
1. Install VMWare Fusion on MAC server.
2. Load various OS/Browser VM's onto MAC SERVER
3. Create scripts to start and stop VM's from OS/X
4. Install Selenium Grid on MAC server
5. Create scripts to start and stop GRID.
6. Setup Selenium RC's on VM's and include RC's in the startup and run RC's on background.
7. Commands to Stop/Start GRID and VM's
Step1:
Download VMWare fusion from http://www.vmware.com/products/fusion/
Step2:
Create various OS/Browser VM's and Zip it and transfer onto MAC server
You can skip this step if MAC sever is located in your premises. You can transfer VM file using external hard driver or USB drive
For zipping use below command
gzip filename
A compressed file with extension .gz will be created.
To transfer the file to the MAC server use below command
navigate to the directory where file is located. Then enter below command
sftp macServerusername@macServerIP
it ask for password, enter the password, then “sftp<” promt will display.
Then enter below command
put filename
once transfer is completed, unzip the file. Use below command
gunzip filename
Step3: Create scripts to start and stop VM's from OS/X
Create a shell script to start all VM's .
#!/bin/sh
cd /
cd Library/Application\ Support/VMware\ Fusion/
./vmrun -T ws start "/Users/test/ Vista IE7.vmwarevm"
./vmrun -T ws start "/Users/test/ Vista IE8-FF36.vmwarevm"
./vmrun -T ws start "/Users/test/ XP IE6.vmwarevm"
./vmrun -T ws start "/Users/test/ XP IE7.vmwarevm"
./vmrun -T ws start "/Users/test/ XP IE8-FF36.vmwarevm"
Create a shell script to stop all VM's .
#!/bin/sh
cd /
cd Library/Application\ Support/VMware\ Fusion/
./vmrun -T ws stop "/Users/test/ Vista IE7.vmwarevm"
./vmrun -T ws stop "/Users/test/ Vista IE8-FF36.vmwarevm"
./vmrun -T ws stop "/Users/test/ XP IE6.vmwarevm"
./vmrun -T ws stop "/Users/test/ XP IE7.vmwarevm"
./vmrun -T ws stop "/Users/test/ XP IE8-FF36.vmwarevm"
Step 4: Install Selenium Grid on MAC server
Selenium Grid setup instructions are available on selenium site (http://selenium-grid.seleniumhq.org/get_started.html)
If java JDK is not setup, setup by including path in the system variables. Setup ANT path.
Go at the root of selenium grid directory and validate your installation:
$ cd selenium-grid-1.0
$ ant launch-hub
Step 5:Create scripts to start and stop GRID.
Shell script to start GRID
$ cd selenium-grid-1.0
$ ant launch-hub
Shell script to stop GRID
curl -d action=shutdown http://localhost:4444/lifecycle-manager
Step 6:Setup Selenium RC's on VM's and include RC's in the startup and run RC's on background.
Create Batch script to individual RC on VM's
Here is the sample Batch script (.bat)
cd C:\selenium-grid-1.0.8
ant -Dport=5590 -Dhost=1.2.3.4 -DhubURL=http://2.3.4.5:4448 -Denvironment="Firefox on Windows" -DseleniumArgs="-firefoxProfileTemplate \"C:\Users\test\AppData\Roaming\Mozilla\Firefox\Profiles\nlw66qbe.default"\" launch-remote-control
Step7: Create VBS script to run RC in the background. Give the RC batch file path in the VBS script.
Set WshShell = WScript.CreateObject("WScript.Shell")
obj = WshShell.Run("C:\GRID-RC.bat", 0)
set WshShell = Nothing
Include VBS file in the startup.
Sunday, November 14, 2010
Selenium Framework1 : Selenium IDE,RC,ANT,TestNG, Eclipse IDE
Architecture:
Using this framework we can run tests from command line or from eclipse IDE.
This framework uses Selenium IDE,RC,ANT,TestNG, Eclipse IDE.
Selenium IDE: selenium IDE used to record a testcase, exporting it into Java.
Selenium RC:Converted test case in java can be executed using selenium RC.
TestNG: tesNG is used for configuration and report results.
ANT: This build tool is to execute tests from command line.
Setup:
1. Install JDK. Here is the link to install JDK.
2. Install ANT. Here is the link to install Ant.
3. Install Eclipse. Here is the link.
4. Install testNG Eclipse plug-in ..Link
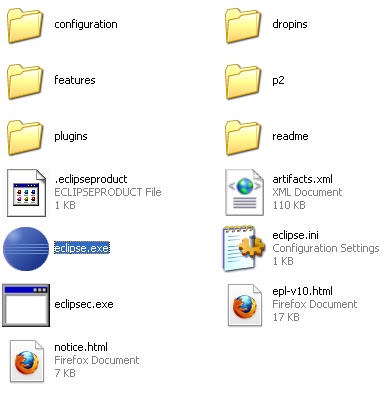
5.open the eclipse.exe file and create a workspace and a project.
Select the path where you want ur project files needs to be stored.

6. Create a project
File-->New--> Java project

 Give the project name and select first radio in the project layout,then click next.
Once project is created, project name will display in the left side package explorer.
Now create four packages with names "framework", "test", "lib","Conf".
right click on project, select new--> package. then enter the package name.
a) Framework package is for Baseclass and other common methods.
b) tests - It contains all tests
c) lib - It contains all library files
d) Conf - It contains configurtion file( xml file ) to execute the tests.
7. Download following jar files and copy to the "Lib" folder.
a) testng jar link
b) Selenium server jar - Download RC
c) Selenium java cleint driver - link
d) log4j jar - link
 8. after copying above jar files in the lib folder, right click on project and click on properties.
Now, add all four files to the buildpath.
 9. right click on framework , select New--> class. give the class name as BaseTest.
once basetest.java file created, copy code from this link.
10. right click on tests, select New--> class. give the class name as test1.
once test1.java file created, copy code from this link
11. right click on conf, select New--> file. give the class name as AC-run.xml.
once AC-run.xml file created, copy code from this link
12. right click on project, select New--> file. give the class name as build.xml.
once build.xml file created, copy code from this link.
After all above steps are completed, structure should look like below.
 13. Now we are good to execute tests from conf file.
right click on AC-run.xml file and select Run as--> TestNG Suite
 14. testNG result will display as below

15. Html output will be stored in the "test-output" as below

Using this framework we can run tests from command line or from eclipse IDE.
This framework uses Selenium IDE,RC,ANT,TestNG, Eclipse IDE.
Selenium IDE: selenium IDE used to record a testcase, exporting it into Java.
Selenium RC:Converted test case in java can be executed using selenium RC.
TestNG: tesNG is used for configuration and report results.
ANT: This build tool is to execute tests from command line.
Setup:
1. Install JDK. Here is the link to install JDK.
2. Install ANT. Here is the link to install Ant.
3. Install Eclipse. Here is the link.
4. Install testNG Eclipse plug-in ..Link
5.open the eclipse.exe file and create a workspace and a project.
Select the path where you want ur project files needs to be stored.

6. Create a project
File-->New--> Java project


Once project is created, project name will display in the left side package explorer.
Now create four packages with names "framework", "test", "lib","Conf".
right click on project, select new--> package. then enter the package name.
a) Framework package is for Baseclass and other common methods.
b) tests - It contains all tests
c) lib - It contains all library files
d) Conf - It contains configurtion file( xml file ) to execute the tests.
7. Download following jar files and copy to the "Lib" folder.
a) testng jar link
b) Selenium server jar - Download RC
c) Selenium java cleint driver - link
d) log4j jar - link
Now, add all four files to the buildpath.

once basetest.java file created, copy code from this link.
10. right click on tests, select New--> class. give the class name as test1.
once test1.java file created, copy code from this link
11. right click on conf, select New--> file. give the class name as AC-run.xml.
once AC-run.xml file created, copy code from this link
12. right click on project, select New--> file. give the class name as build.xml.
once build.xml file created, copy code from this link.
After all above steps are completed, structure should look like below.
right click on AC-run.xml file and select Run as--> TestNG Suite

15. Html output will be stored in the "test-output" as below

AC-run.xml
<!DOCTYPE suite SYSTEM "http://beust.com/testng/testng-1.0.dtd">
<suite name="regression test">
<parameter name="baseurl" value="www.google.com"/>
<parameter name="hostname" value="localhost" />
<parameter name="browser" value="*firefox" />
<test name="regression test">
<classes>
<class name="tests.test1"> </class>
</classes>
</test>
</suite>
<suite name="regression test">
<parameter name="baseurl" value="www.google.com"/>
<parameter name="hostname" value="localhost" />
<parameter name="browser" value="*firefox" />
<test name="regression test">
<classes>
<class name="tests.test1"> </class>
</classes>
</test>
</suite>
test1
package tests;
import com.thoughtworks.selenium.*;
import org.testng.annotations.*;
import org.testng.internal.thread.TestNGThread;
import framework.BaseTest;
public class test1 extends BaseTest {
@Test public void test() throws Exception {
selenium.open("https://members.kaiserpermanente.org/kpweb/signon.do");
selenium.windowMaximize();
selenium.windowFocus();
TestNGThread.sleep(3000);
// selenium.waitForPageToLoad("30000");
assertTrue(selenium.isElementPresent("//div[@id='brand']/img"));
assertTrue(selenium.isElementPresent("userid"));
assertTrue(selenium.isElementPresent("password"));
selenium.type("password", "jhkjh");
}
}
BaseTest.java
package framework;
import java.io.File;
import com.thoughtworks.selenium.*;
import org.apache.log4j.Logger;
import org.openqa.selenium.server.RemoteControlConfiguration;
import org.openqa.selenium.server.SeleniumServer;
import org.testng.annotations.*;
import org.testng.internal.thread.TestNGThread;
public class BaseTest extends SeleneseTestCase {
private SeleniumServer server;
public static Selenium selenium;
public static Logger logger = Logger.getLogger(BaseTest.class.getName());
@Parameters( { "browser", "hostname", "baseurl","firefox-profile-location" })
@BeforeClass(alwaysRun = true)
public void testUntitled(String browser,
String hostname,
String baseurl,
@Optional("") String firefoxProfileLocation) throws Exception {
try {
if("localhost".equals(hostname)) {
if(!"".equals(firefoxProfileLocation)) {
RemoteControlConfiguration config = new RemoteControlConfiguration();
config.setFirefoxProfileTemplate(new File(firefoxProfileLocation));
server = new SeleniumServer(false, config);
}
else {
server = new SeleniumServer();
}
server.start();
}
} catch (Exception t) {
logger.error("Unable to start Selenium server", t);
fail("Unable to start Selenium server: " + t.getMessage());
}
int port=4444;
selenium = new DefaultSelenium(hostname, port, browser, baseurl);
selenium.start();
}
@AfterClass(alwaysRun = true)
public void closeBrowserAfterEachClass() {
if (selenium != null) {
selenium.close();
selenium.stop();
}
}
}
Install TestNG Eclipse plug-in
open Eclipse.exe
Navigate to Help--> install new software
 add testNG plugin url http://beust.com/eclipse.

select testNG and click "next" and complete installing.

verify whether installation or not by navigating to windows--> preferences.
testNG should be displayed in the left side.

Navigate to Help--> install new software


select testNG and click "next" and complete installing.

verify whether installation or not by navigating to windows--> preferences.
testNG should be displayed in the left side.
Install Eclipse
Download Eclipse classic the file from http://www.eclipse.org/downloads/
unzip the file and open eclipse.exe.

unzip the file and open eclipse.exe.
How to install Maven on windows
Go to Start-->Run and type "cmd"
Command prompt window will open, then type "mvn"
If you see " mvn is not recognized as an internal or external command" message, then you need to install Maven.
Download ant binary file from http://maven.apache.org/download.html
 unzip the downloaded file and copy into the C:\Program Files..
Copy the bin directory path. We need to add Maven bin directory path to system environment variables path.
right click on My computer and select properties-->Advanced-->environment variables-->System variable--> select path and click on edit.
Add Maven bin path to as shown in below image. Click "Ok".
Now, Restart the machine and open command prompt and enter "mvn -version".
You should see similar message as below.
Command prompt window will open, then type "mvn"
If you see " mvn is not recognized as an internal or external command" message, then you need to install Maven.
Download ant binary file from http://maven.apache.org/download.html

Copy the bin directory path.

right click on My computer and select properties-->Advanced-->environment variables-->System variable--> select path and click on edit.
Add Maven bin path to as shown in below image.

Now, Restart the machine and open command prompt and enter "mvn -version".
You should see similar message as below.

How to install ANT on windows
Go to Start-->Run and type "cmd"
Command prompt window will open, then type "ant"
If you see " ant is not recognized as an internal or external command" message, then you need to install ant.
Download ant binary file from http://ant.apache.org/bindownload.cgi.
 unzip the downloaded file and copy into the C:\Program Files\ANT..
Copy the bin directory path.
 We need to add ant bin directory path to system environment variables path.
right click on My computer and select properties-->Advanced-->environment variables-->System variable--> select path and click on edit.
Add ANT bin path to as shown in below image.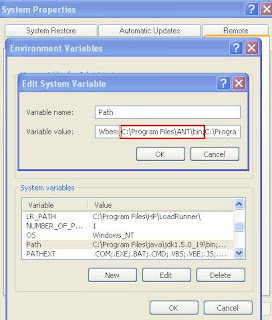 Click "Ok".
Now, Restart the machine and open command prompt and enter "ant -version".
You should see similar message as below.

Command prompt window will open, then type "ant"
If you see " ant is not recognized as an internal or external command" message, then you need to install ant.
Download ant binary file from http://ant.apache.org/bindownload.cgi.

Copy the bin directory path.

right click on My computer and select properties-->Advanced-->environment variables-->System variable--> select path and click on edit.
Add ANT bin path to as shown in below image.

Now, Restart the machine and open command prompt and enter "ant -version".
You should see similar message as below.
How to install jdk on windows
Go to Start-->Run and type "cmd"
Command prompt window will open, then type "java -verion"
If you see " Java is not recognized as an internal or external command" message, then you need to install JDK.
Download the file from http://www.oracle.com/technetwork/java/index.html
Click on "Java SE"
 Then, click on "Download JDK"
 Enter Sun online account info in the next screen, create one account if you don't have a sun online account.
Once download is complete, unzip the file. and copy the file in C:\Program Files\java.Now, copy the bin directory path.
 We need to add bin directory path to system environment variables path.
right click on My computer and select properties-->Advanced-->environment variables-->System variable--> select path and click on edit.
Add jdk bin path to as shown in below image.
 Click "Ok".
Now, Restart the machine and open command prompt and enter "java -version".
Command prompt window will open, then type "java -verion"
If you see " Java is not recognized as an internal or external command" message, then you need to install JDK.
Download the file from http://www.oracle.com/technetwork/java/index.html
Click on "Java SE"

Once download is complete, unzip the file. and copy the file in C:\Program Files\java.Now, copy the bin directory path.

right click on My computer and select properties-->Advanced-->environment variables-->System variable--> select path and click on edit.
Add jdk bin path to as shown in below image.

Now, Restart the machine and open command prompt and enter "java -version".
You should see similar message as below.

Hi
Hi All,
I would like to document all the testing related information, so that it will be helpful to others.
Thanks
Pramod
I would like to document all the testing related information, so that it will be helpful to others.
Thanks
Pramod
Subscribe to:
Posts (Atom)